Using AJAX to Drive Dependent Report Parameters
January 23, 2007
Submitted by Mike D'Amour, Pentaho Team Developer
A very common goal in dynamic reporting is to give the user the ability to specify some particular criteria to filter a report on, before the report data is queried for. These criteria are called parameters, and the Secure Filter Component in the Pentaho platform allows solution developers to achieve this goal. Taking the feature one step further, users many times would like to filter or choose a second set of criteria, based on the first parameter they chose. For instance, Jody manages the Western division of her company. The Western division has different products than the Eastern division. So the first parameter Jody would like to choose is the Western division. Based on that selection, Jody would like to see only Western division products. This is often called a master\slave relationship, where one set of slave data is dependent on a master set of related data.
This article explains a sample solution (I'll call it the dep-param solution) that Mike D'Amour created for providing the master\slave feature while still utilizing all of the power of the platform's Secure Filter Component. Mike's solution is very clean, using AJAX to dynamically populate a combobox with the slave filter selections on the parameter page, once the master selection is chosen. I'll get into more details in the article as we go about what this sample can do out of the box, and where it can be extended.
Resources Before You Get Started
The following software is what I used to build out this article. I highly recommend you set up these bits in your environment before you get started. While it may seem like a bit of work, each project has a very simple install and setup.
- Pentaho Design Studio (PDS) version 1.2 or later.
- Pentaho Pre-configured Installation (PCI) running locally, and the hypersonic database running locally with the SampleData database, version 1.2 or later.
- The dep-param Solution Files, courtesy of Mike D'Amour. (Pentaho team developer)
Sample Use Case
The Pentaho sample data is quite simplistic. The table that we will use in this exercise is QUADRANT_ACTUALS. The QUADRANT_ACTUALS table contains Region, Department, PositionTitle (job title), Actual, Budget and Variance data. Each department has a unique list of position titles.
We want to be able to create a report that will show actual and budget data for a selected position title within a department. We will set up the solution so that the user must first select a department, which will then filter the list of position titles that they choose from.
For the sake of keeping this solution simple and focusing on what needs to be done to enable the master\slave parameter feature, the output for the data will result in a plain table of data in the browser, rather than a new report. Some of the input data is also hard coded, although we easily could define additional SQL Lookup Rules for database retrieval instead. Also, the dep-param solution we are demonstrating here only accounts for one master\slave set of dependent fields, and the control used on the page must be a combo box. Once we have explained how this specific problem is solved, we will discuss how you can extend this solution to handle multiple dependencies (for example, select a region, that then filters departments, that then in turn filters position title). We will also talk briefly about how to tweak the solution to accommodate other control types, such as radio buttons, check boxes, etc.
Let's get started!
Step-By-Step
As I mentioned in the "Resources.." section, it's important at this point that you have the PCI and the Pentaho Design Studio installed and ready to run somewhere on your computer. If you have any questions on how to set these things up, they all have installation and user guides located at http://www.pentaho.org/download/latest.php. From here forward I will assume you have the necessary tools for the exercise.
Install the dep-param Solution
First thing you will want to do is install the dep-param solution for this article in the solutions folder that came with the PCI demo. Download the zipped file from this page, and extract the content to the following directory:
<HOME>/pentaho-demo/pentaho-solutions/samples/reporting
with <HOME> being the top level drive and/or directory that you installed the PCI to. The structure should look similar to the following path once the files are extracted:
<HOME>\pentaho-demo\pentaho-solutions\samples\reporting\dep-param\<all the sample solution files here>
Once you have installed the solution files installed, start your Pentaho server if you haven't already. If your server was running when you installed the dep-param solution, just Publish To Repository (from the demo home page, choose Admin | Repository), and you will be all set.
Navigate to the dep-param solution, so we can test that the solution indeed works:
- Using your favorite browser, navigate to the PCI demo homepage. If you installed the PCI locally and chose the default set up, that URL would be http://localhost:8080. If you changed any of the defaults, or installed to a different domain or port that URL will be slightly different. If you have any trouble finding the PCI home page, consult the Getting Started with the BI Platform documentation.
- From the PCI home page upper right corner, select Go | Solutions | Reporting Samples | Dependent Parameter Examples .
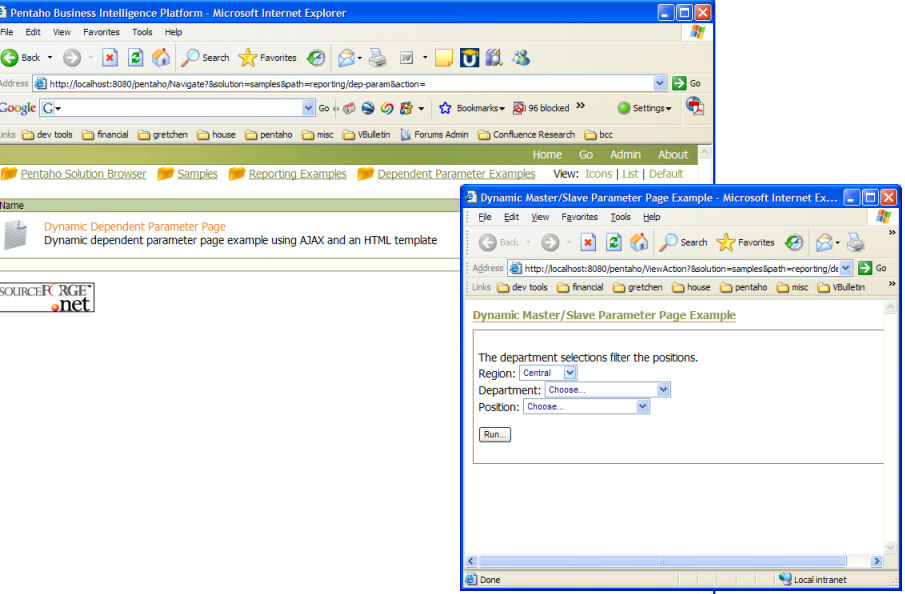
- From this page, select Dynamic Dependent Parameter Page. You should see a prompt for parameters, similar to the following screenshot:
Open the dep-param Solution in the Design Studio
We are going to examine the solution files that Mike used to demonstrate the master\slave parameters. The first thing we need to do is set up the Design Studio so that we can work and debug directly from the sample solutions that come with the PCI. (If you want to use your own solution directories, that's fine too, just modify the following steps to accommodate your structure).
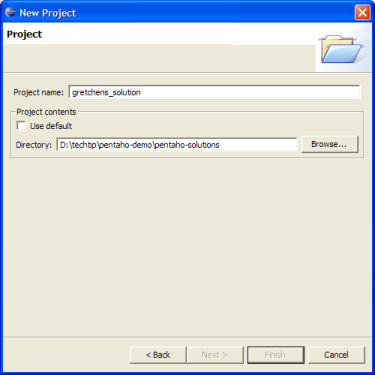
- Open the Pentaho Design Studio. From the main menu, choose File | New Project | Simple Project.
- The wizard walks you through setting up your project. When prompted for the location of your project files, uncheck the "use default" checkbox, and enter the path to the PCI sample solutions directory, usually located at <pentaho-pci-root>/pentaho-solutions. Name your project something you like; I named mine param_solutions.
- Click the Finish button, and you are all set. You can now work with the solution files that we installed in the previous step.
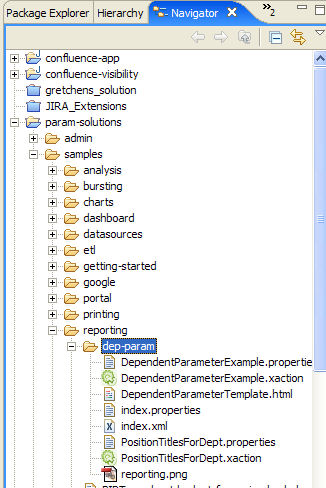
- Using the Java Perspective, and the Navigator view, navigate to the dep-param folder, under <solution-root>\samples\reporting\dep-param. You should see the following files:
Explaining the dep-param Files
Before we delve into the technical detail of the action sequences, let me first explain the purpose of each solution file, to help give you a better perspective of how this solution works as a whole.
There are several files in our dep-param directory, but the only ones that contribute to the workings of this feature (and that we will concern ourselves with here) are DependentParameterExample.xaction, PositionTitlesForDept.xaction, and DependentParameterTemplate.html. The rest of the files in the directory (if you aren't already familiar with Pentaho solutions) support externalizing your solution's strings for localization, and support the appearance of the solution within the PCI demo. To learn more about these support files in detail, you can browse some of our early tech tips, as well as the Internationalization documentation.
The DependentParameterExample.xaction is the main action sequence. In this action sequence, we set up the Secure Filter Component that will request a region and department from the user. Once the user has chosen the department, we will submit a request to the server to get the list of position titles for that department. Retrieving the department specific position titles happens via the PositionTitlesForDept.xaction. I will get in to details on how the second action sequence gets executed in a minute, but for right now its useful to understand that there is no reloading of the page or the Secure Filter Component when we retrieve the position titles,as that function is an AJAX call.
The way we enable AJAX and the dynamic loading of the dependent parameter, position title, is by using a custom DHTML file as the template for the page that the Secure Filter Component (in our first action sequence) generates. That file is DependentParameterTemplate.html.
That's alot to digest in a very compressed fashion, so let's walk through the action sequences and the DHTML template in the Design Studio. Step by step, we will put the bits together and help you understand how Mike came up with this solution.
The DependentParameterExample Action Sequence
The DependentParameterExample action sequence controls our solution. Let's dig in and see what's in there.
- Open the DependentParameterExample.xaction in the Pentaho Design Studio. You can do this by navigating to the dep-param directory in our solution's project, and double-clicking on the DependentParameterExample.xaction file.
- In the Process Inputs box at the top of the page, you should see an inputs folder. Expand that folder using the plus sign next to the folder. In the inputs folder are the six inputs needed for our simple solution. We need three String inputs to hold the three selections that the user will specify: REGION, DEPARTMENT and POSITIONTITLE. Then we also need a String-list input to hold the available values for each of the three selections: that would be the REGION_FILTER, DEPARTMENT_FILTER and POSITIONTITLE_FILTER.
- Click on the REGION_FILTER String-list input. Notice that the Default Value checkbox is checked, and there are 4 hard coded values in the defaults list. We have hard coded the region values for the REGION selection, ONLY for the sake of simplicity. We could have used a SQL Lookup Rule to populate the REGION_FILTER values, but instead wanted to keep the example as simple as possible.
- The DEPARTMENT_FILTER values are also hard coded, in order to keep things simple. Click the DEPARTMENT_FILTER String-list input, and you will see it too has several default values.
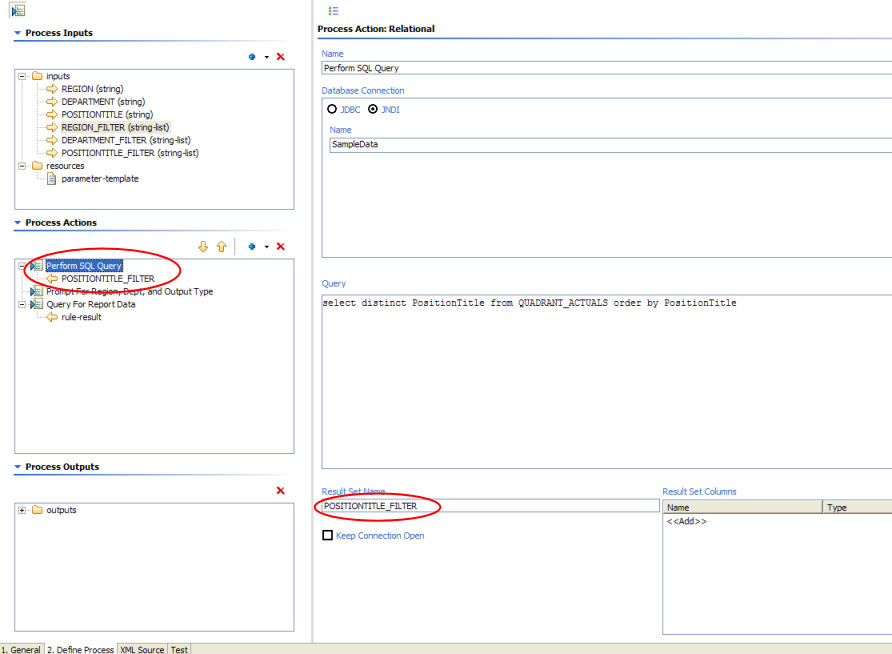
- We start the action sequence by running a query to populate the POSITIONTITLE_FILTER String-list. Click on the first action in the Process Actions box, labeled "Perform SQL Query". You can examine the details of this action, and see that the query is retrieving all position titles from the database, and the resultset is being stored in the POSITIONTITLE_FILTER input.
At this point , you might ask, why are we populating the position title list now? We don't know what department the user will choose, so we will throw this list away anyway when we issue the command to retrieve only those position titles related to the chosen department. This is a bit of awkwardness that is necessary becuase of the nature of the Secure Filter Component. You see, the Secure Filter Component requires that, at the time of execution, it has a valid list of selections to validate the user's choice against. This prevents hackers from introducing values into the action sequence that could be potentially harmful or could expose confidential data. When we execute the Secure Filter Component at the beginning of the action sequence, we don't know what department will be selected, so we can't populate the filtered list of position titles. But we can start out with the COMPLETE list of position titles from the database, thus any department that is chosen later on will always send a list of valid position titles for the user to choose from, satisfying the Secure Filter Component's requirements. - Our next step is to define our Secure Filter Component, that will generate the parameter page, prompting our user for the 3 selections we set up inputs for: REGION, DEPARTMENT, and POSITIONTITLE. Select the second action in the Process Actions box, titled "Prompt For Region, Dept, and Output Type".
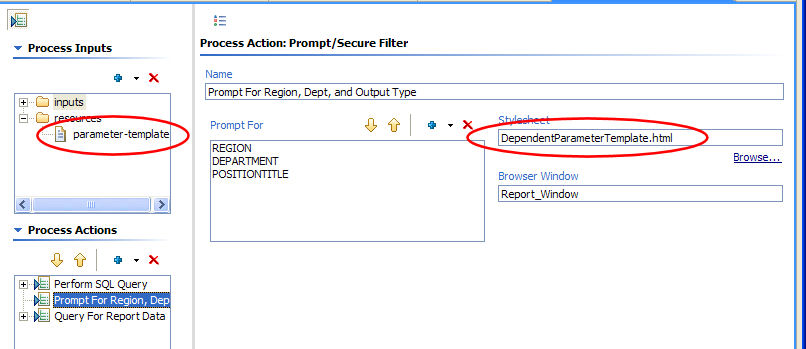
- Click on each of the parameters in the "Prompt For" box in the right hand pane. Notice that these parameters are set up pretty standard: the String input is reserved to hold the user's selection and the list of choices (Source of Choices in the right pane) is coming from the String-list inputs we defined .
- The magic of populating the position title combo box based on the department selection comes from changing the template that the Secure Filter Component uses to render the parameter page. Notice in the Stylesheet field on the right pane, it lists our DependentParameterTemplate.html. That is a means for bringing the DependentParameterTemplate.html file into our action sequence.
The DependentParameterTemplate.html file is the template we are telling our Secure Filter Component to use. We will take a look at DependentParameterTemplate.html in greater detail in a moment, but first let's finish examining this action sequence. - The last step in our action sequence executes after the Secure Filter Component has completed its work. The last action takes the values selected by the user and queries the database using those values as parameters in the query. If you are not familiar with parameterized queries or the PREPARE statement, you can learn more in this technical article.
So the action sequence is really not that special, intentionally so for demonstration purposes. The real key to this solution is in the template that we assigned to the Secure Filter Component for generating the parameter page. Let's take a look at DependentParameterTemplate.html next.
The DependentParameterTemplate.html Template File
The DependentParameterTemplate.html file is a custom template file from which the parameter page is built. Some of what we will see in the template file is boilerplate, while much of the Javascript and the form control definitions are specific to this solution. I will try to distinguish between the two as we examine the code.
- Open the DependentParameterTemplate.html file in the Design Studio. If you have any trouble opening the file, right click on it in the Navigator window, and select Open With => Text Editor.
- The first section of code we will look at in this template is the HTML inside the <form></form> tags.
This HTML represents the boilerplate template code you would use to create a parameter page for the platform. The tags highlighted in red are the code needed to automatically build controls for each of the parameters we are expecting from the user: REGION, DEPARTMENT, POSITION TITLE. By specifying each input inside curly braces, you are telling the platform to replace these place holders with the values specified in the Secure Filter Component definition. The rest of the form should be left as is.
<form name="parameter-form" id="parameter-form" method="POST"> <table width="100%" style="padding:5px;"> <tr> <td class="portlet-font">The department selections filter the positions.</td> </tr> <tr> <td class="portlet-font">Region: {REGION}</td> </tr> <tr> <td class="portlet-font">Department: {DEPARTMENT}</td> </tr> <tr> <td class="portlet-font">Position: {POSITIONTITLE}</td> </tr> <tr> <td><br/><input type="button" name="go" class="portlet-form-button" value="Run..." onClick="doForm()"/></td> </tr> </table> {solution} {action} {path} </form> - The next bit of code we want to look at is the Javascript at the bottom of the page. This script will be executed once the template loads in the user's browser. The template is sent to the user's browser on execution of the Secure Filter Component in our action sequence, outlined above.
This Javascript allows us to identify the control we need to listen to for a value change (ie., when department changes values, we should ask the server for the right list of postion titles), and set the control's onchange() event to the function that will ask the server for the list of position titles. The returnObjById() function is requesting the id of the control named DEPARTMENT. The platform names the controls the same as their place holder when it creates them from the <form> HTML we reviewed above. Then, the DEPARTMENT control's onchange function pointer is set to our function, departmentChangeFunction(). This function merely calls another function we have defined that will make a call to the server executing an action sequence as a service.
<script>
<![CDATA[

   var deptControl = returnObjById("DEPARTMENT");   deptControl.onchange=departmentChangeFunction;

   function departmentChangeFunction() {
	    paramService(new Array( "dept", deptControl.value, "solution", "samples", "path",
		                     "reporting/dep-param", "action", "PositionTitlesForDept.xaction" ),
		                    "parseSOAPResultSet(\"POSITIONTITLE\", ", "");
	  }

]]>
</script>
The action sequence we are directing it to execute is PositionTitlesForDept.xaction, which will retrieve the list of position titles for the selected department. We specify the selected department value, the solution, the path to the solution and the action sequence as name\value pairs in the array that is the first parameter to our paramService() function. The second parameter to the function is the first half of yet another function name, a function that will be executed when a return result from this function call is recieved. When we study the paramService() function in detail, you will see that this is where the request is sent to the server in an asynchronous manner. That is why we need to specify what should happen next, when the result is returned.
We will take a look at the returnObjById() function and the paramService() function next. - The following bit of Javascript comes from the top of the DependentParameterTemplate.html file. The first function, doForm(), is part of the boilerplate, which I will briefly explain, then we will move on to the rest of the code, which Mike wrote specifically to support our master\slave feature. I know, it looks like alot of code, but when we break it down, function by function, it's really pretty simple to understand.
The doForm() function is the same in all templates that are used in the platform. The function builds the URL that we want to submit back to the server with the values selected in the form fields appended as parameters to the URL.
<script>
<![CDATA[

var url=unescape('ViewAction?');
var target=unescape('');

function doForm() {
  var submitUrl = url;
  var form = document.forms['parameter-form'];
  var elements = form.elements;
  var i;
  for( i=0; i<elements.length; i++ ) {
   if( elements[i].type == 'select-one' || elements[i].type == 'text' || elements[i].type == 'hidden') {
      submitUrl += '&' + elements[ i ].name + '=' + escape( elements[ i ].value );
   } else if( elements[i].type == 'radio' ) {
      if( elements[i].checked ) {
         submitUrl += '&' + elements[ i ].name + '=' + escape( elements[ i ].value );
      }
   } else if( elements[i].type == 'checkbox' ) {
      if( elements[i].checked ) {
         submitUrl += '&' + elements[i].name + "=" + escape( elements[i].value );
      }
   }  else if( elements[i].type == 'select-multiple' ) {
      var options = elements[i].options;
      var j;
      for( j=0; j!=options.length; j++ ) {
       if( options[j].selected ) {
          submitUrl += '&' + elements[i].name + '=' + escape( options[ j ].value );
       }
      }
   }
  }

  if( target == '' ) {
     document.location.href=submitUrl;
  } else {
     window.open( submitUrl, target );
  }
  return false;
}
The returnObjById() function is the function that gets called after the template loads in the user's browser, to identify the control that we want to hook up to our on change event. If you examine the Javascript, you can see that we are testing the various methods available to us (these methods are browser dependent), and retrieving the id when successful.function returnObjById( id ) { if (document.getElementById) var returnVar = document.getElementById(id); else if (document.all) var returnVar = document.all[id]; else if (document.layers) var returnVar = document.layers[id]; return returnVar; }The beginning of the sendRequest() function should look familiar to anyone who has worked with AJAX. It uses the standard mechanism for obtaining an XMLHttpRequest, based on which browser the user is using. The XMLHttpRequest is the magic behind sending asynchronous calls back to the server, without having to re-submit the entire browser page. The last 6 lines of code, we are setting up the XMLHttpRequest for our server call, then sending the request. The URL that we are sending to is the Pentaho ServiceAction URL, whiich is how you can execute an action sequence as a service in the platform. More on that in a moment. The "query" parameter that we are sending contains the parameters that the ServiceAction needs to know about in order to know which action sequence to execute, as well as any parameters that the action sequence itself requires. The function that you point to in the XMLHttpRequest's onreadystatechange is the function that will execute when there are results to return from the server back to this web page. In our case, you will see in a moment that we are pointing to a function that will parse out the position titles that we asked for in the XMLHttpRequest.function sendRequest( url, query, func, dependentFunction ) { http_request = false; var returnType = "text/xml"; if (window.XMLHttpRequest) { // Mozilla, Safari,... http_request = new XMLHttpRequest(); if (http_request.overrideMimeType) { http_request.overrideMimeType(returnType); } } else if (window.ActiveXObject) { // IE try { http_request = new ActiveXObject("Msxml2.XMLHTTP"); } catch (e) { try { http_request = new ActiveXObject("Microsoft.XMLHTTP"); } catch (e) {} } } if (!http_request) { alert('Cannot create XMLHTTP instance'); return false; } http_request.onreadystatechange = function() { pentahoResponse(http_request, func, dependentFunction); }; http_request.open('POST', url, true); http_request.setRequestHeader("Content-type", "application/x-www-form-urlencoded"); http_request.setRequestHeader("Content-length", query.length); http_request.setRequestHeader("Connection", "close"); http_request.send(query); }The pentahoResponse function is the function that gets called when there are results to return from the server. The func parameter passed in to this function call is the name of the function that gets evaluated or executed here. In our case, that function is the parseSOAPResultSet function below, that we will cover in a moment. Notice that in the eval() statement, that the content is appended to the func parameter, as in building a String. The Javascript eval function does just that, evaluates a string to see if it can execute it as a function. So pay close attention ot the syntax of the func parameter when you are passing it in the paramService() call at the bottom of the template page! You can trace the code through these function calls to see how the parseSOAPResultSet function was passed from the paramService() function hooked up to the onchange event for the DEPARTMENT control, to the sendRequest() function, hooked up to the onreadystatechange event in the XMLHttpRequest, finally to be executed here in the pentahoResponse() function. All of the hoops are necessary because talking to the server and getting an answer back are independent of one another, so when you start the process, you have to alert those actions all the way down the line what you want the outcome to be. In Javascript that's accomplished as we did it here - through function pointers and events.function pentahoResponse(http_request, func, dependentFunction) { if (http_request.readyState == 4) { if (http_request.status == 200) { var content = http_request.responseText; eval( func+'content )' ); eval( dependentFunction ); } else { eval( func+'( "There was a problem with the request." )' ); } } }Finally, the paramService function(), the function that we first saw at the bottom of our template page. Remember we passed a list of parameters to this function, the name\value pairs? Well they are used here to build the query parameter that we will send to the server to identify what action sequence to execute as a service, and hand the department parameter to the specific action sequence we are executing. You can pass any number of parameters through the ServiceAction this way, depending on what your needs are. I explained above what the func parameter was for, but what about the dependentFunction parameter? The dependentFunction is a second function we may want to execute if we are stringing together multiple (more than 2) fields that have the master\slave relationship. I'll explain this in more detail at the end of the article.function paramService( params, func, dependentFunction ) { var url = "/pentaho/ServiceAction"; var query = ""; if( params ) { query += "?"; for( idx=0; idx<params.length; idx+=2 ) { query += "&" +escape( params[idx] ) + "=" + escape( params[idx+1] ); } } return sendRequest( url, query, func, dependentFunction ); }And last, the parseSOAPResultSet function. This function, in the shortest fashion, parses apart the content returned from the ServiceAction, which is a SOAP response. There are much more structured and object oriented means if extracting content from a SOAP response, but again, we were coding here for brevity and compactness, and we didn't want to require extra Java libraries in order for you to work with this example. We pass in the control name, because we want the code to extend to more than one dependent field in the form (should you have multiple master\slave relationships). The content parameter is the content that resultset sent back from the server, in the form of an XML SOAP response.function parseSOAPResultSet(dependentControlName, content) { CDATA_START_TAG = "\<DATA-ITEM\>\<!\[CDATA\["; CDATA_END_TAG = "\]\]\>\</DATA-ITEM\>"; dependentControl = returnObjById(dependentControlName); dependentControl.options.length = 0; index = 0; while (content.indexOf(CDATA_START_TAG) >= 0) { cdataBeginIdx = content.indexOf(CDATA_START_TAG); cdataEndIdx = content.indexOf(CDATA_END_TAG); text = content.substring(cdataBeginIdx+CDATA_START_TAG.length, cdataEndIdx); content = content.substring(cdataEndIdx+CDATA_END_TAG.length); dependentControl.options[index] = new Option(text, text); index++; } } ]]> </script>
Multiple Dependent Fields - More Than One Master and Slave
This implementation will support more than one master\slave relationship. For instance, what if we wanted the list of Position Titles to be driven by the Department that gets chosen, and the list of Departments to be filtered by the Region that was chosen? This is an example where the chained relationship allows a cascading effect to happen to drive multiple field selections on the form. This brings us back to the dependentFunction parameter that we pass down ultimately to the pentahoResponse function. This parameter should be the name of the function that the slave's onchange event points to, and will be executed as soon as the SOAP response is parsed (See the pentahoResponse() function). We need to pass and execute this function in this way, because the onchange event for the controls only fires when the USER changes a value in the control, NOT when the value changes as a result of script execution.
The following code demonstrates this concept, using the example of Region driving Department selections, and Department driving Position Title selections:
<script>
	      <![CDATA[

	     var regionControl = returnObjById("REGION");
	     regionControl.onchange=regionChangeFunction;

	     var deptControl = returnObjById("DEPARTMENT");
	     deptControl.onchange=departmentChangeFunction;

	     function departmentChangeFunction() {
	        paramService(new Array( "dept", deptControl.value, "solution", "samples", "path", "reporting/dep-param",
		                "action", "PositionTitlesForDept.xaction" ),
                      	"parseSOAPResultSet(\"POSITIONTITLE\", ", "");
	     }

	     function regionChangeFunction() {
	        paramService(new Array( "region", regionControl.value, "solution", "samples", "path", "reporting/dep-param",
	                     "action", "DepartmentsForRegion.xaction" ),
		    		   "parseSOAPResultSet(\"DEPARTMENT\", ", "departmentChangeFunction()");
	     }

	      ]]>

          </script>
Note that you now need another action sequence, to return to you the list of departments that you are requesting.
The Action Sequence as a Service: Querying for the List of Position Titles
Once the user chooses a department, we issue a call tot he ServiceAction, executing an action sequence that issues a query for the list of appropriate position titles. There is nothing fancy about this last action sequence, but I wanted to include a look at it here, so there is nothing left unclear.
- Open PositionTitlesForDept.xaction in Design Studio.
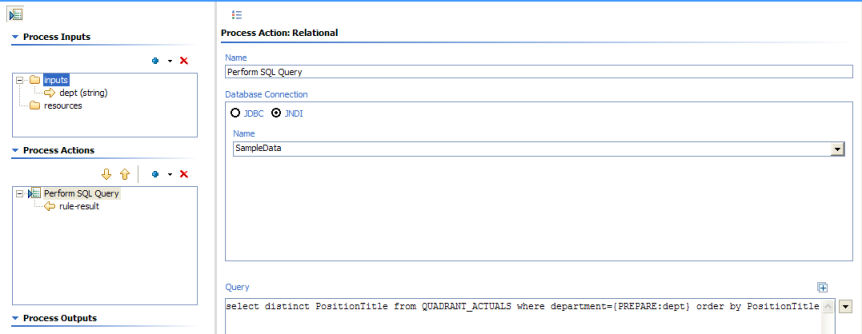
- You will see that the action sequence consists of one action, a SQL Lookup Rule, querying for the postion titles by the department that was passed in as an input parameter.
Tweaking for Other Controls
If I haven't mentioned it yet, this code is written specifically geared toward combo boxes as the controls that we manipulate. You would have to tweak a bit of the code, notably the parseSOAPResultSet() function to get this to work with radio buttons, check boxes, etc.
