/
Getting Report Parameter Choices from the Database
Getting Report Parameter Choices from the Database
This article describes how to prompt a user to select a parameter for a report and have those choices come from the database.
It builds on the previous article Setting Up Parameters With the Design Studio.
This article assumes that you've completed steps 1-5 in the previous article. Please note that the version of Design Studio I am using is version 1.7.0 which is a bit different from the version used in the previous article.
Define the inputs
This section is very similar to the previous article with the major difference being that you only need to create one input instead of two.
- Right-click on the folder named Inputs in the Process Inputs box. Select Add... | Input from the menu.
- In the new editor page, type CUSTOMER in the textbox labeled "Name". Leave the Type defaulted to string.
- Check the box labeled "Has Default Value". This is very important. Even if you don't want a default value you MUST check the box. Otherwise you will get a NULL pointer exception being thrown when you run the action.
- Save your action sequence
Get the selections from the Database
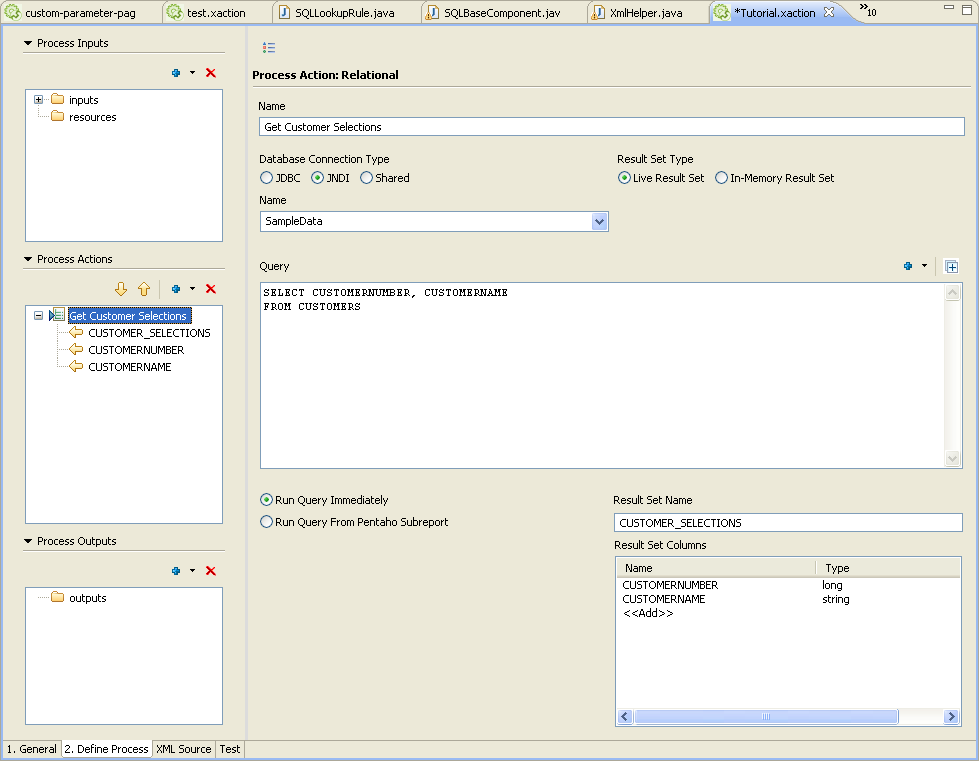
- In the Process Actions box, click the 'Add' button and choose 'Get Data From > Relational'
- Rename you action, e.g. Get Customer Selections
- Enter your JNDI name, for this example we will use 'SampleData'
- Now enter your SQL that will return a result set of the values you want the user to choose from.
- You can return multiple columns in your result set.
- One of those columns needs to contain the values that you want to use in the SQL for your report. e.g. the primary key part of the foreign key relationship
- You can also return a second column that can be used to name those choices to make the choice screen more user friendly.
- e.g.
SELECT CUSTOMERNUMBER, CUSTOMERNAME
FROM CUSTOMERS
- Now set the result set columns to be the EXACT names of the columns returned in your SQL. Make sure you use 'string' for the column type regardless of what is actually returned (otherwise the column name won't appear in the Prompt action below). For this example it would be
- CUSTOMERNUMBER:string
- CUSTOMERNAME:string
- Now name the result set e.g. CUSTOMER_SELECTIONS
- Save your action secuence
Prompt the User
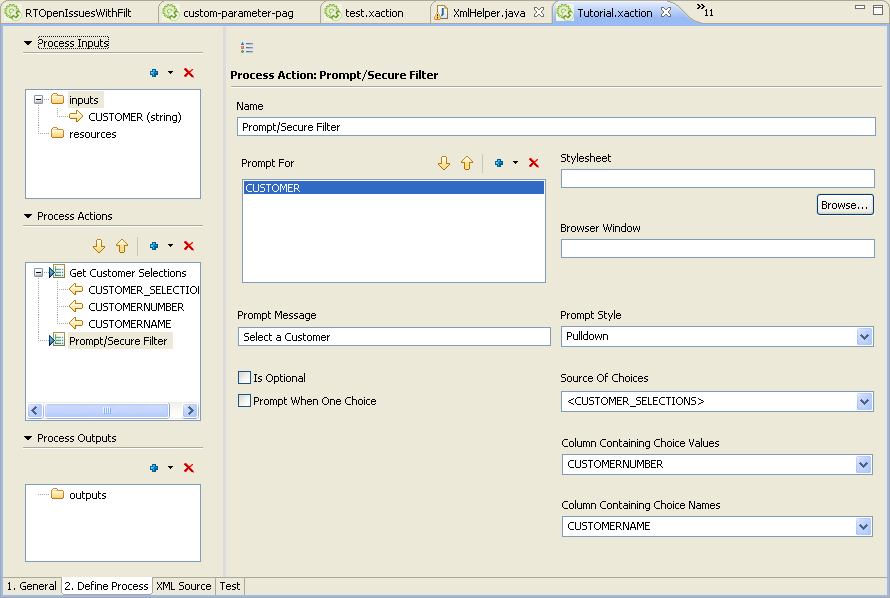
- In the Process Actions box, click the add button and select 'Prompt/Secure Filter'
- Rename it if you want
- In the Prompt For box click the add button and select the input you want the user to select, in our case CUSTOMER
- Type in a prompt message
- Select a prompt style, seeing as we only want the user to select one choice go with 'Pulldown'
- In the source of choices select the result set returned from the previous action i.e. CUSTOMER_SELECTIONS
- Now you choose which columns will be used for the value of the selection and which one for the name. For this example choose CUSTOMERNUMBER for the value and CUSTOMERNAME for the name. This way the CUSTOMER input will be given the NUMBER of the customer chosen but the user will actually select the NAME of the customer.
Use the Parameter in you SQL
- In the Process Actions box, click the 'Add' button and choose 'Get Data From > Relational'
- Rename you action, e.g. Get Customer Selections
- Enter your JNDI name, for this example we will use 'SampleData'
- Now enter your SQL that will return a result set for the report
- You can use any inputs by wrapping it in {} and prepending the word PREPARE: to the name. e.g.
SELECT *
FROM ORDERS
WHERE CUSTOMERNUMBER = {PREPARE:CUSTOMER}
Selecting multiple Choices
To allow the user to choose multiple options you only need to change the above steps in a few places.
- When creating you input, select string-list instead of string for the type
- In the Prompt Style selection choose one of the styles that allow for multiple selections, e.g. Check List
- In your report SQL use the IN operator instead of = e.g.
SELECT *
FROM ORDERS
WHERE CUSTOMERNUMBER in ({PREPARE:CUSTOMER})
Sample Action Sequences
, multiple selections available,
Related content
Designing Reports With MySQL and JNDI
Designing Reports With MySQL and JNDI
Read with this
Creating an Address Label Report
Creating an Address Label Report
Read with this

