Include Transforming Data within Hive
Create a Hive Table
NOTE: This task may be skipped if you have completed the Loading Data into Hive guide.
- Open the Hive Shell: Open the Hive shell so you can manually create a Hive table by entering 'hive' at the command line.
- Create the Table in Hive: You need a hive table to load the data to, so enter the following in the hive shell.
create table weblogs ( client_ip string, full_request_date string, day string, month string, month_num int, year string, hour string, minute string, second string, timezone string, http_verb string, uri string, http_status_code string, bytes_returned string, referrer string, user_agent string) row format delimited fields terminated by '\t'; - Close the Hive Shell: You are done with the Hive Shell for now, so close it by entering 'quit;' in the Hive Shell.
- Load the Table: Load the Hive table by running the following commands:
hadoop fs -cp /weblogs/parse/part-00000 /user/hive/warehouse/weblogs/
Create a Database Connection to Hive
If you already have a shared Hive Database Connection defined within PDI then this task may be skipped.
- Start PDI on your desktop. Once it is running choose 'File' -> 'New' -> 'Job' from the menu system or click on the 'New file' icon on the toolbar and choose the 'Job' option.
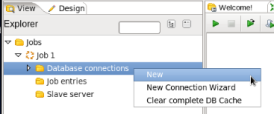
- Create a New Connection: In the View Palette right click on 'Database connections' and select 'New'.
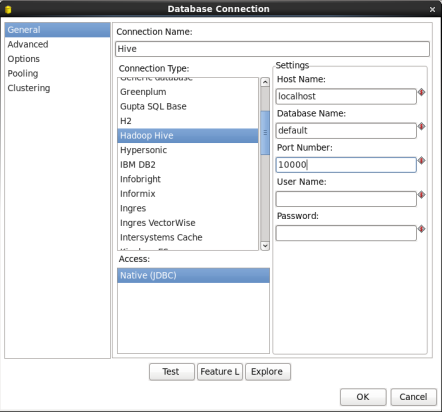
- Configure the Connection: In the Database Connections window enter the following:
- Connection Name: Enter 'Hive'
- Connection Type: Select 'Hadoop Hive'
- Host Name and Port Number: Your connection information. For local single node clusters use 'localhost' and port '10000'.
- Database Name: Enter 'Default'
When you are done your window should look like:
Click 'Test' to test the connection.
If the test is successful click 'OK' to close the Database Connection window.
- Share the Hive Database Connection: You will want to use your Hive database connection in future transformations, so share the connection by expanding 'Database Connections' in the View Palette, right clicking on 'Hive', and selecting 'Share'.
Sharing the connection will prevent you from having to recreate the connection every time you want to access the Hive database in a transformation.
Create a Job to Aggregate Web Log Data into a Hive Table
In this task you will create a job that runs a Hive script to build an aggregate table, weblogs_agg, using the detailed data found in the Hive weblogs table. The new Hive weblogs_agg table will contain a count of page views for each IP address by month and year.
Speed Tip
You can download the Kettle Job aggregate_hive.kjb already completed
- Start PDI on your desktop. Once it is running choose 'File' -> 'New' -> 'Job' from the menu system or click on the 'New file' icon on the toolbar and choose the 'Job' option.
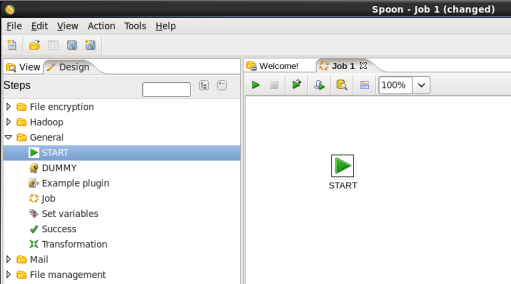
- Add a Start Job Entry: You need to tell PDI where to start the job, so expand the 'General' section of the Design palette and drag a 'Start' node onto the job canvas. Your canvas should look like:
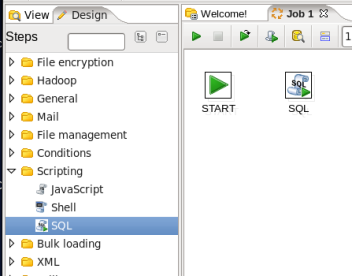
- Add a SQL Job Entry: You are going to run a HiveQL script to create the aggregate table, so expand the 'Scripting' section of the Design palette and drag a 'SQL' node onto the job canvas. Your canvas should look like:
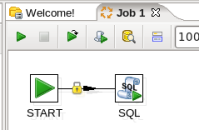
- Connect the Start and SQL Job Entries: Hover the mouse over the 'Start' node and a tooltip will appear. Click on the output connector (the green arrow pointing to the right) and drag a connector arrow to the 'SQL' node. Your canvas should look like this:
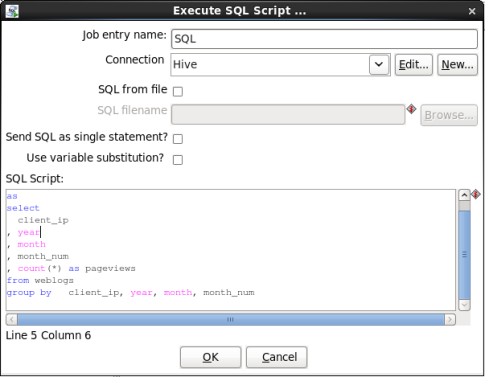
- Edit the SQL Job Entry: Double-click on the 'SQL' node to edit its properties. Enter this information:
- Connection: Select 'Hive'
- SQL Script: Enter the following
When you are done your window should look like:
create table weblogs_agg
as
select
  client_ip
, year
, month
, month_num
, count(*) as pageviews
from weblogs
group by   client_ip, year, month, month_num
Click 'OK' to close the window.
- Save the Job: Choose 'File' -> 'Save as...' from the menu system. Save the transformation as 'aggregate_hive.kjb' into a folder of your choice.
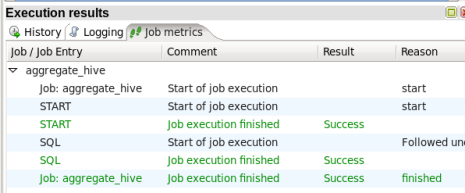
- Run the Job: Choose 'Action' -> 'Run' from the menu system or click on the green run button on the job toolbar. A 'Execute a job' window will open. Click on the 'Launch' button. An 'Execution Results' panel will open at the bottom of the PDI window and it will show you the progress of the job as it runs. After a few seconds the job should finish successfully:
If any errors occurred the job step that failed will be highlighted in red and you can use the 'Logging' tab to view error messages.
Check Hive
- Open the Hive Shell: Open the Hive shell by entering 'hive' at the command line.
- Query Hive for Data: Verify the data has been loaded to Hive by querying the weblogs table.
select * from weblogs_agg limit 10;
- Close the Hive Shell: You are done with the Hive Shell for now, so close it by entering 'quit;' in the Hive Shell.
Summary
During this guide you learned how to transform data within Hive within a PDI job flow.
, multiple selections available,
