Introduction
This document explains techniques for controlling access to data used in action sequence, in the Pentaho BI Platform. It assumes familiarity with the Pentaho BI Platform, creating action sequences using the action sequence editor, and SQL database queries. We recommend reading the Creating Pentaho Solutions guide and Getting Started with Design Studio prior to reading this document.
Motivation
When developing an action sequence, you may need to restrict a user's view of the available data based on some criteria. For instance, you may develop an action sequence that queries a database for financial information, and displays the financial information in a web page. However you may want to restrict a user's view of the financial data to the data from the user's region (e.g. Eastern, Southern, Western, Northern). You can use a system action to assist in filtering the data provided to the user.
System Action
A system action is simply an action sequence that is configured to run either at system start time (i.e. when the application server starts) or session start time (i.e. when the user logs in). The output of a system action is available to other action sequences as input parameters. System actions are configured by adding the appropriate child elements to the <system-action> element in the pentaho.xml file.
------------------- what to do with this junk? -------------
What is session and global scope?
TODO
In addition, the output is available to portlets and/or Servlets/jsps.
(scope="global")
(scope="session").
(org.pentaho.ui.portlet.PentahoPortletSession)
(org.pentaho.core.session.PentahoHttpSession)
--------------------------------------------
The first step in configuring a system action is to locate and edit the pentaho.xml. In the Pentaho Preconfigured Install, the pentaho.xml file is located in the pentaho-demo/system folder.
You configure a system action by adding information about your action sequence to the <system-action> node of the pentaho.xml file. For instance, if your action sequence is called usernameToRegion.xaction, it exists in the repository under samples/filters, you want the action sequence to run when the user logs in, with the output placed in session scope, and you want the output of the action sequence to be available in a portlet, you would write this xml element:
<org.pentaho.ui.portlet.PentahoPortletSession scope="session">
   samples/filters/usernameToRegion.xaction
</org.pentaho.ui.portlet.PentahoPortletSession>
and place it inside the <system-action> node in the pentaho.xml.
As another example, suppose your action sequence is called setCompanyName.xaction, it exists in the repository under samples/filters, you want the action sequence to run when the system starts up with the output placed in global scope, and you want the output of the action sequence to be available in a Servlet/jsp, you would write this xml element:
<org.pentaho.core.session.PentahoHttpSession scope="global">
   samples/filters/setCompanyName.xaction
</org.pentaho.core.session.PentahoHttpSession>
Let's Break it Down
Let's break it down a bit using the previous examples.
- We make the output of the action sequence available to portlets by creating the XML element
<org.pentaho.ui.portlet.PentahoHttpSession>. - We make the output of the action sequence available to servlets/jsps by creating the XML element
<org.pentaho.core.session.PentahoHttpSession>. - We make the action sequence run at system start time and make output available in global scope by adding the
scope="global"attribute to our element. - We make the action sequence run at session start time and make output available in session scope by adding the
scope="session"attribute to our element. - We identify the name and location of our action sequence by adding
samples/filters/setCompanyName.xactionas a child text node of our xml element.
Your pentaho.xml file would look something like this:
<pentaho-system>
   ...
   <system-actions>
      <org.pentaho.ui.portlet.PentahoPortletSession scope="session">
         samples/filters/usernameToRegion.xaction
      </org.pentaho.ui.portlet.PentahoPortletSession>
      <org.pentaho.core.session.PentahoHttpSession scope="global">
         samples/filters/setCompanyName.xaction
      </org.pentaho.core.session.PentahoHttpSession>
   </system-actions>
   ...
</pentaho-system>
Now you know how to configure a system action, but what might a system action look like that will assist in controlling access to data?
Developing an Action Sequence to Run As a System Action
Pentaho Preconfigured Install
This code was developed with the Pentaho Preconfigured Install, using the SampleData database that comes with the Preconfigured Install.
In this example we'll develop an action sequence to generate an HTML report containing financial data for the current user's region. This suggests that when the user logs in, we need to identify the user's region, and store this information someplace that we can use later in our action sequence.
To identify the user's region, let's create a new action sequence in Eclipse using the action sequence editor.
Name the action sequence usernameToRegion.xaction, and place it in the samples/filters folder of the repository.
The BI Platform Repository
The repository is where resources, like action sequence definition documents are stored in the Pentaho BI Platform. The Platform has a variety of repository implementations. The repository used by the Pentaho Preconfigured Install is a file system repository, and it is located in the pentaho-solutions folder of the Preconfigured Install.
Next, in the action sequence editor, add an input called name to the Process Inputs tree control. Configure it to be of type string, and define its scope to be session.
When the user logs into the BI Platform, the platform places a parameter called name into the session scope. name is the user name that was used to log into the platform. We can get access to this parameter by defining it as an input to our action sequence.
The DEPARTMENT_MANAGERS table of the SampleData database has the columns MANAGER_NAME, REGION, and EMAIL. MANAGER_NAME is the full name of the manager. We need a mechanism for mapping the user's login name to their fullname. We can then use a SQL query in an action sequence to discover the user's region.
We'll do this by adding a JavaScript action to our action sequence. Using the Process Actions tree control in the action sequence editor, click on the Add control (blue + sign with a triangle next to it), and select Generate Data From -> JavaScript. In the JavaScript editor, add this JavaScript code:
fullName = "";
fullNameArray = new Object();
fullNameArray\["joe"\] = "Joe Pentaho";
fullNameArray\["suzy"\] = "Suzy Pentaho";
fullNameArray\["pat"\] = "Pat Pentaho";
fullNameArray\["tiffany"\] = "Tiffany Pentaho";
fullName = fullNameArray\[name\];
This code simply maps the user's login name to the user's full name, and places the full name in a JavaScript variable called fullName. fullName will be available to the next action in our action sequence.
We still need to identify name from the Process Inputs tree control as an input to our JavaScript action. Click on the Add control in the Script Inputs editor, and select name.
We also need to identify the fullName variable from our JavaScript code as an output from our JavaScript action. To do this, click in the Script Outputs editor, type in fullName, and identify its type as string.
Now that we have the fullname as an output parameter, we can use that parameter in the next action to discover the region that the manager is responsible for.
In the Process Actions tree control, click on the Add control and select Generate Data From -> Relational. Make sure the JNDI radio button is selected. Identify the name of the Database Connection as SampleData. Add the following query to the Query editor:
select REGION from DEPARTMENT_MANAGERS where MANAGER_NAME = \{PREPARE:fullName\}
Specify the Result Set Name as RS_MANAGERS_REGION. And make sure Keep Connection Open is unchecked. The values from the result set will be available to us in our next action.
What does "Keep Connections Open" mean?
If Keep Connections Open is not checked, when a Relational action runs a database query, it immediately stores the results of the query into a light-weight java object, and closes the connection to the database. This light-weight java object can be stored as a parameter in request, session or global scope. This makes the object available to other actions in this action sequence, and to other action sequences executing at another time.
Often however, the size of a result is very large, making it expensive to copy the contents into a light-weight java object. It is also expensive to have both objects temporarily in memory at the same time. In this case, it makes sense to have "Keep Connections Open" checked.
This will cause the result-set's connection to the database to be kept open. The result-set will be available to other actions in this action sequence. And a copy will NOT be made to a light-weight java object.
In all cases, the connection to the database is closed at the conclusion of the action sequence. This suggests that a result set that was created with "Keep Connections Open" checked should never be placed in session or global scope, since the result set's connection will be closed at conclusion of the current action sequence, making it unusable.
We now have the name of the region that the manager is responsible for, but it is still in the result set. We don't want to keep the relatively "heavy" result set. We only need the string from the result set with the region information. We can use another JavaScript action to get the region string out of our result set, and then store the region string into our session.
In the Process Actions tree control, click on the Add control and select Generate Data From -> JavaScript.
Since we need access to the result set from the previous action, in the Scripts Input, click on the Add control and select RS_MANAGERS_REGION.
Next, add the following code in the JavaScript editor:
strRegion = RS_MANAGERS_REGION.getValueAt(0,0);
(TODO: add note about NOT declaring as var)
This will get the region string out of the result set and place it in a JavaScript variable called strRegion.
We want to make the variable strRegion available to action sequences that the user may execute later in their session. So we need to place strRegion into the user's session. To do this, add the variable strRegion to the Script Outputs, and identify its type as string. Once we've done this, you'll notice that in the Process Actions tree control, the script output shows up under our JavaScript action. This identifies strRegion as an ouput of the JavaScript action, but we need it to be an output of our action sequence.
To make strRegion an output of our action sequence, in the Process Actions tree control, drag and drop strRegion onto the outputs in the Process Outputs tree control. You'll notice that this will open the Process Output editor in the right pane. In the Process Output editor, click in the first cell of the table, this will display a combo box with a list of scopes (e.g. request, sesion, global, etc.) We want to place strRegion into the session scope, so select session from the combo box. At the conclusion of the action sequence, strRegion will be in the user's session, available to any action sequence executed by the user.
Adding strRegion to the user's session isn't terribly useful unless we do something with it. Earlier I talked about using the user's region information to control access to the data the user sees in a financial report. Let's create an action sequence that will filter the data returned by a relational database query and display it in a simple HTML report.
Create a new action sequence in Eclipse using the action sequence editor. Call it getActualsForRegion.xaction, and place it in the samples/filters folder of the repository.
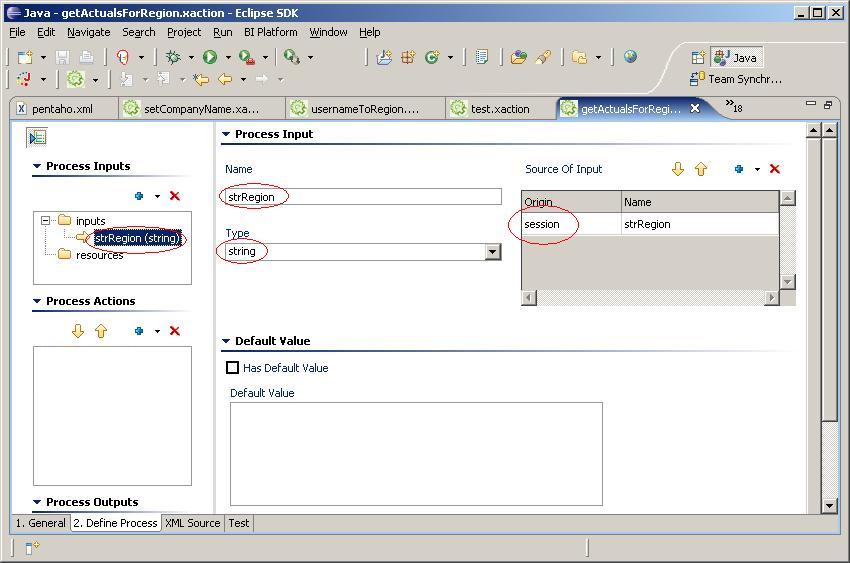
Next, in the action sequence editor, add an input called strRegion to the Process Inputs tree control. Configure it to be of type string, and define its scope to be session. This will give us access to the output parameter strRegion of our userNameToRegion.xaction action sequence.
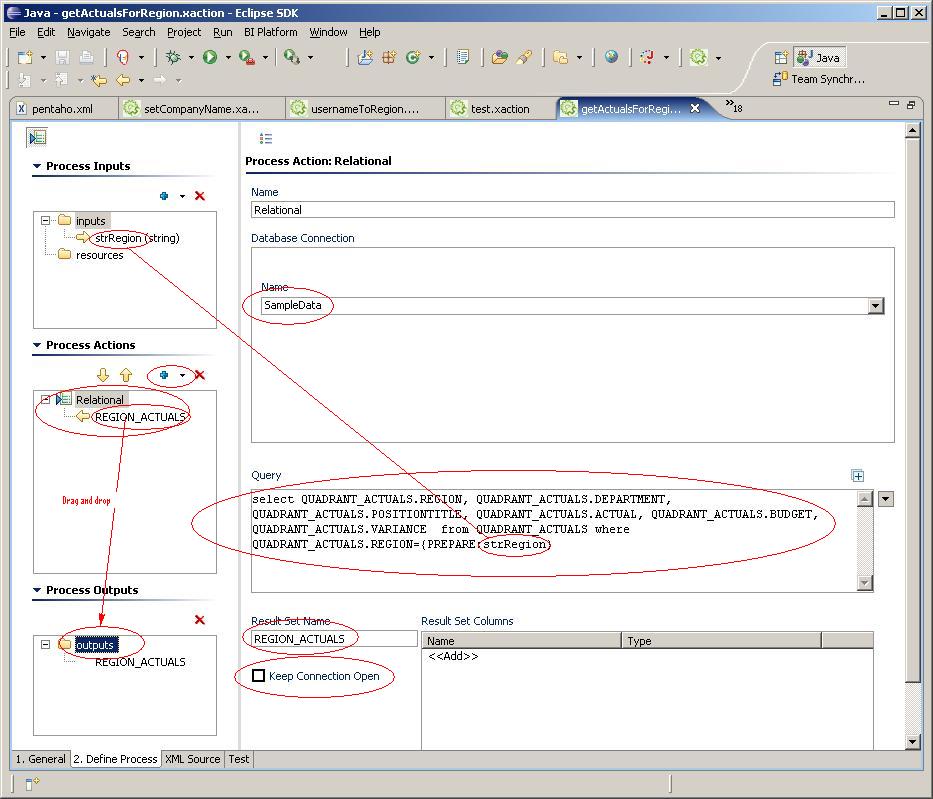
In the Process Actions tree control, click on the Add control and select Get Data From -> Relational. Make sure the JNDI radio button is selected, and that the JNDI name is SampleData.
In the SampleData database, there is a table called QUADRANT_ACTUALS containing financial information. The table has a variety of columns with financial data, and one column identifying the region that the data is associated with. We will use the strRegion parameter from our Process Inputs to filter the SQL query using a SQL where clause. Add this query to the Query editor:
select QUADRANT_ACTUALS.REGION, QUADRANT_ACTUALS.DEPARTMENT,
QUADRANT_ACTUALS.POSITIONTITLE, QUADRANT_ACTUALS.ACTUAL,
QUADRANT_ACTUALS.BUDGET, QUADRANT_ACTUALS.VARIANCE
from QUADRANT_ACTUALS where QUADRANT_ACTUALS.REGION=\{PREPARE:strRegion\}
Specify the Result Set Name as REGION_ACTUALS. And make sure Keep Connection Open is unchecked.
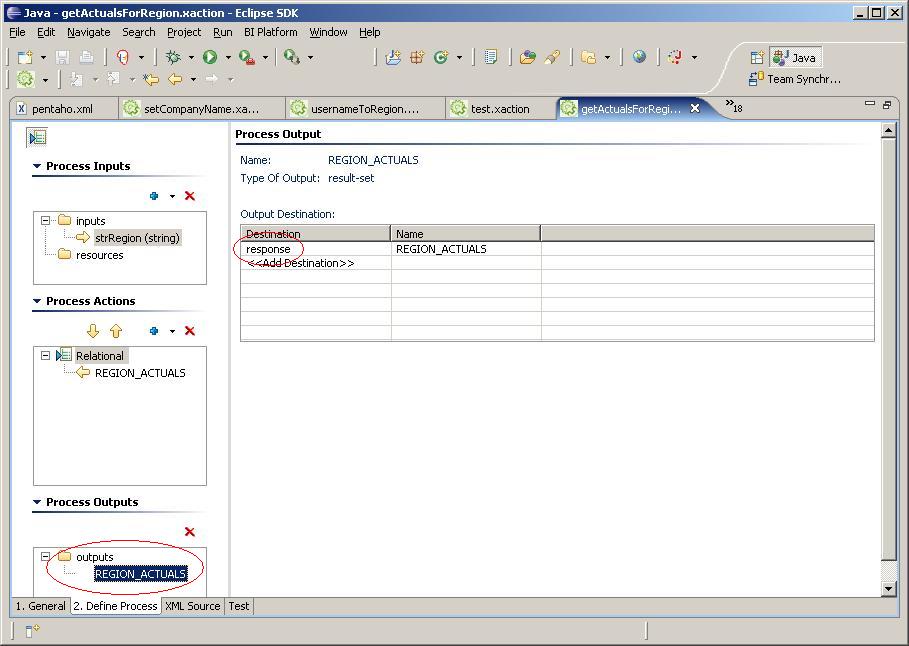
In order place the information in the result set into the output for our HTML page, expand the Relational node in the Process Actions tree control, and drag and drop REGION_ACTUALS onto the outputs node of the Process Outputs tree control.
This will open the Process Output editor in the right pane. Click in the first cell of the table, and select response from the combo box. This will place the text of the REGION_ACTUALS result set input the HTTP response stream. This is similar to writing HTML text to the HttpResponse in a Servlet/jsp.
Configuring Our System Action
In order for our getActualsForRegion action sequence to run successfully, we need to configure the userNameToRegion action sequence to run when the user logs in. To do this we need to modify the pentaho.xml file. The pentaho.xml file is located in the system folder of the pentaho-solutions folder of the Pentaho Preconfigured Install. You should recall that in the section Configuring System Actions I discussed adding this xml element:
<org.pentaho.ui.portlet.PentahoPortletSession scope="session">
   samples/filters/usernameToRegion.xaction
</org.pentaho.ui.portlet.PentahoPortletSession>to the <system-actions>
to the pentaho.xml file.
h2: Running our action sequence
In order for this example to run, we need to start the Hypersonic database (Todo: link to starting the Hypersonic DB) and start the JBoss server that is hosting the Pentaho BI Platform ( TODO:link to starting the JBoss server).
Next, in a browser access http://localhost:8080/portal/portal/Pentaho/%5B01%5DHome. This is the home page for the portal in the Pentaho Preconfigured Install. Click on the link in the bottom left "Standard Login".
To login, click on the text "click here to login as Joe", this will populate the Login form with Joe's credentials. Click the Login button.
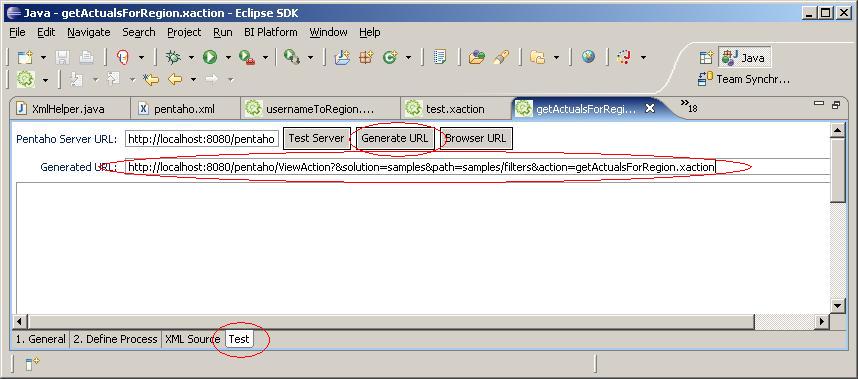
Next we need the URL that runs our action sequence. To get this URL, go back to the action sequence editor, and click on the Test tab in the bottom right corner. Click on the Generate URL button. Copy the generated URL, and paste it into your browser.
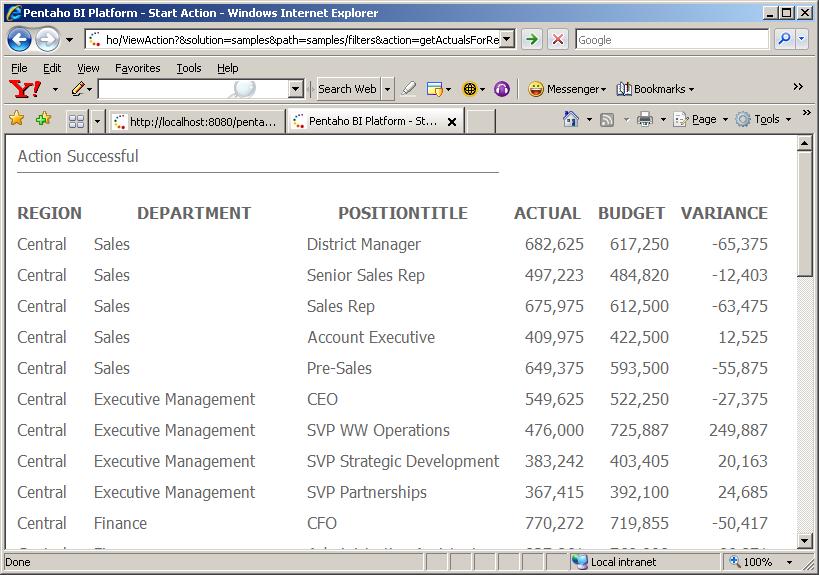
You should get something like this:
It may be interesting to log out, and log back in as Suzy, and run the action sequence again. Notice how the output has changed to deliver financial information for the region that Suzy is responsible for.
Wrap Up
Action sequences that are run as system actions are powerful tools for supplying action sequences with parameters whose values don't change during the lifetime of the user's session, or the lifetime of the application. If you are a Servlet/jsp developer, you should see that this is much like the way you work with parameters in the application context and the session context of Servlets and jsps.
action sequences that are run as system actions in session scope are useful for caching information that is unique to an individual user. The user's full name, or the region that a manager is responsible are examples of the kind of information you may store in a session parameter.
Often an application works with lists of things, for instance a list of regions. These lists are typically used by applications to populate menus, or validate data. This data generally doesn't change during the lifetime of the application. These lists are prime candidates for creation by an action sequence that is run as system action at global scope. If you think about it, I am sure you can come up with some examples of your own!
