You are viewing an old version of this page. View the current version.
Compare with Current
View Page History
« Previous
Version 9
Next »
Description
Data validation is typically used to make sure that incoming data has a certain quality. Validation can occur for various reasons, for example if you suspect the incoming data doesn't have good quality or simply because you have a certain SLA in place.
The Data Validator step allows you to define simple rules to describe what the data in a field should look like. This can be a value range, a distinct list of values or data lengths.
This step allows for an unlimited amount of validation rules to be applied in a single step on the incoming data.
Version
This step was introduced in version 3.1.0-M1 of Pentaho Data Integration.
Options
Option |
Description |
Step name
|
The name that uniquely identifies the step.
|
Name of field to validate
|
The name of the field to validate
|
Error code
|
The error code to pass to error handling for this validation rule. (overrides the default)
|
Error description
|
The error description to pass to error handling for this validation rule. (overrides the default) |
Type
|
- Verify data type? : Check this if you want to specify a certain data type to match.
- Data type : specify the data type of the data specified in this dialog or the data type to verify
- Conversion mask : the mask to use to convert the data specified in this validation rule
- Decimal symbol: the decimal symbol to use to convert the data specified in this validation rule
|
Data
|
This block of information contains the actual bulk of the validation rule
- Null allowed? : Disable this option if you don't want to allow null values in the data for the selected field.
- Max string length : Verify the length of the string-form of the data of the selected field, make sure it's shorter than or as long as the length specified here.
- Min string length : Verify the length of the string-form of the data of the selected field, make sure it's longer than or as long as the length specified here.
- Maximum value : Verify the data of the selected field and see if it's not higher than the maximum value specified here.
- Minimum value : Verify the data of the selected field and see if it's not lower than the minimum value specified here.
- Expected start string : the string value of the value we validate needs to start with this value (when specified)
- Expected end string : : the string value of the value we validate needs to end with this value (when specified)
- Regular expression expected to match : the string value of the value we validate needs to match this regular expression (when specified)
- Regular expression not allowed to match : the string value of the value we validate is not allowed to match this regular expression (when specified)
- Allowed values : Make sure that the data of the selected field is only one of the values in the list.
You can use the buttons to the right to add or remove values from the list.
- Read allowed values from another step? : enable this option to source the data from another step in the transformation.
This effectively removes the need to hard code allowed values. You can now store them in a database table or a file somewhere.
You also need to specify the step and field to read from if this option is selected.
IMPORTANT : For every validation that sources data you need to specify a different step to read from.
|
Error Handling and Samples
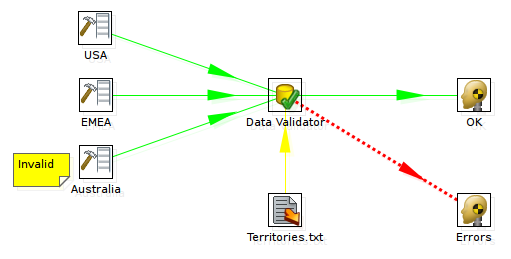
This step supports error handling. As such, it is possible to pass the rows that don't validate in this step to a separate step.
For example, see this transformation:
samples/transformations/Data Validator - validate data against external reference data.ktr
samples/transformations/Data Validator - all usecases with error handling.ktr

You can configure error handling by right clicking on the Data Validator step. See also the users guide over here: Transformation steps.
All fields of this step support metadata injection. You can use this step with ETL Metadata Injection to pass metadata to your transformation at runtime.
