...
- Copy the cdcollection.xml file to the following directory under your PCI's solution folders: <pentaho-demo>/pentaho-solutions/samples/etl/cdcollection.xml.
- Launch Kettle's Spoon application using the spoon.bat (Windows users) or the spoon.sh (*nix users) file in the root of the Kettle installation.
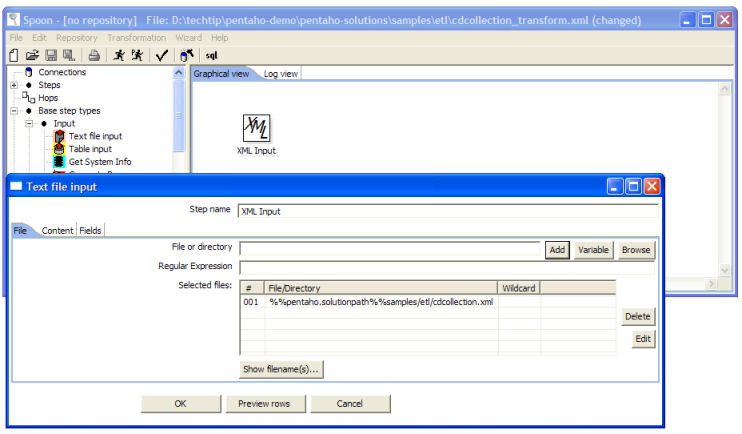
- In the tree on the left pane, locate the XML Input step under Base step types | Input. Drag an XML Input step from the tree in the left pane to the right working pane.
- Double-click on the XML Input step in the right working pane to bring up the XML Input step properties dialog.
- Click the Browse button to locate the cdcollection.xml file in the Pentaho solution folders. Once you have selected the file, you will see the path to it in the File textbox.
- Next, we want to substitute the path to the root of the solutions folders with the environment variable pentaho.solutionpath, so when we move this solution to another server (likely in a real world scenario), the path to the data file remains relative to the solution and won't need to be changed. To do this, click on the Variable button. From the popup list, select pentaho.solutionpath. Notice that %%pentaho.solutionpath%% (${pentaho.solutionpath} in *nix) has been prepended to the path to the xml file.
- Now change the path to the xml file so that the %%pentaho.solutionpath%% replaces the root portion of the path to the solution files, and change all backslashes to forward slashes. In our example, the new path would look like this:
Code Block %%pentaho.solutionpath%%samples/etl/cdcollection.xml
- We change the slashes because it is safest to use '/' as the file path separator as this text is used by Spoon and the Pentaho server and it will work equally well on Windows and Linux and OS X, whereas '\' will only work on Windows.
- Click the Add button to add the path to your xml file to the Selected Files list.
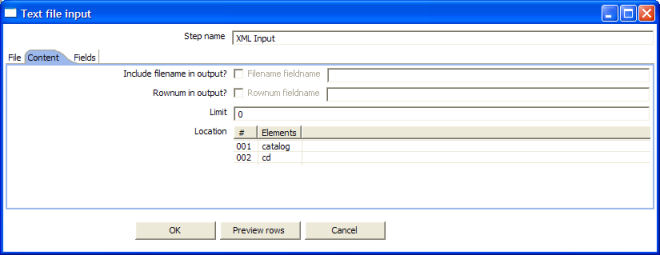
- Switch to the Content tab. Here we want to specify the location of the node in the xml file that represents the repeating data that will become rows of data in our resultset. In the cdcollection.xml file the cd node under the catalog node is the location that represents our repeating data. In the Location list, add the catalog element first, then add the cd element second.
- Switch to the Fields tab. Click the Get Fields button. If all has gone well, you should see the Field list populated with 4 fields - Title1, Artist1, Price1 and Category1.
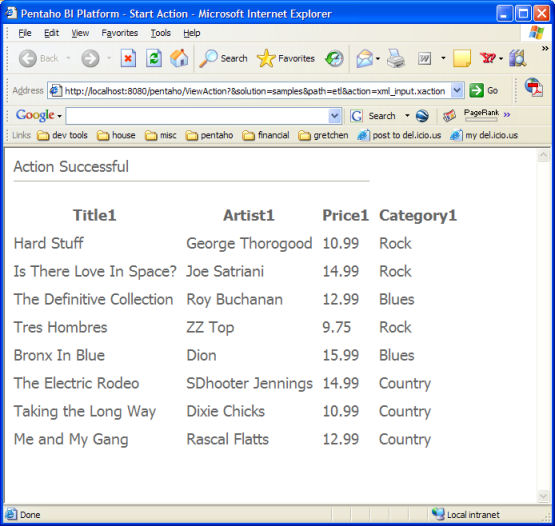
- Click the Preview Rows button. Your transformation is working successfully if you get a popup dialog filled with the CD collection data. If you don't, go back and carefully verify each step again.
- Click OK to close the properties dialog.
- Finally, we want to export your new transformation to your Pentaho solutions folders. From the File menu, choose the Export to XML option, and save your transformation as cdcollection_transform.xml in the <pentaho-demo>/pentaho-solutions/samples/etl directory.
...
- To finish this thing up, we will reuse the sample etl action sequence that comes with the PCI.
- Make a copy of the SampleTransformation.xaction file and name that copy xml_input.xaction. You can find the SampleTransformation.xaction file in <pentaho-demo>/pentaho-solutions/sampes/etl directory.
- Make a copy of the SampleTransformation.properties file and name that copy xml_input.properties. You can find the SampleTransformation.properties file in <pentaho-demo>/pentaho-solutions/sampes/etl directory.
- Open the xml_input.properties file in your favorite text editor.
- At the top of the file, change the value of the <name> node to be xml_input.xaction. It should look like this:
| Code Block |
|---|
<name>xml_input.xaction</name> |
...


